If you’re looking for a quick, easy, and healthy meal, you’ve come to the right place! Air fryer chicken breast is the perfect solution for busy weeknights when you want something flavorful but don’t want to spend hours in the kitchen. With the air fryer, you can achieve perfectly cooked, juicy chicken breasts every time, and in just 20 minutes! Here’s how to make the most tender, juicy, and delicious chicken breast in your air fryer.
Why Use an Air Fryer for Chicken Breast?
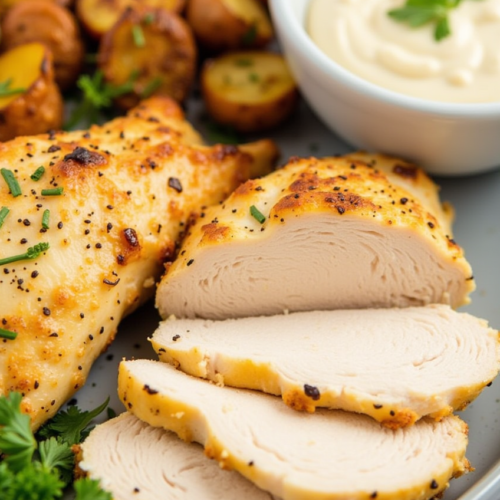
Air fryers have become incredibly popular for their ability to create crispy and juicy meals without all the oil of traditional frying methods. For chicken breasts, they help lock in moisture while giving you that delicious, slightly crispy exterior. The result is a perfectly cooked chicken breast that is tender and juicy inside with a flavorful, golden-brown crust on the outside. Plus, the air fryer cooks your food faster than an oven, making it an ideal kitchen tool when you’re pressed for time.
Juicy Air Fryer Chicken Breast (Quick & Easy!)
Ingredients
- 2 boneless skinless chicken breasts (around 6 oz each)
- 1 tablespoon olive oil or melted butter
- 1 teaspoon garlic powder
- 1 teaspoon onion powder
- 1 teaspoon paprika for a hint of smokiness
- 1/2 teaspoon dried oregano optional, for extra flavor
- Salt and pepper to taste
- Fresh herbs optional, for garnish
Instructions
How to Make Juicy Air Fryer Chicken Breast
Follow these simple steps to get the juiciest chicken breast in your air fryer:
Step 1: Prep the Chicken Breasts
- Start by patting the chicken breasts dry with paper towels. This helps remove excess moisture, allowing the seasoning to stick better and creating a crispy exterior. If your chicken breasts are thicker than 1 inch, you might want to consider either pounding them to an even thickness or slicing them horizontally to ensure they cook evenly.
Step 2: Season the Chicken
- Drizzle the olive oil (or melted butter) over the chicken breasts, making sure they’re coated evenly. This helps the seasoning stick and adds moisture. In a small bowl, mix together the garlic powder, onion powder, paprika, dried oregano (if using), salt, and pepper. Sprinkle the seasoning mix generously over both sides of the chicken breasts. You can also massage the seasoning into the chicken to ensure it’s well coated.
Step 3: Preheat the Air Fryer
- Preheat your air fryer to 375°F (190°C) for about 3-5 minutes. This step ensures that the chicken will cook evenly and have that beautiful crispy exterior.
Step 4: Cook the Chicken
- Place the seasoned chicken breasts in the air fryer basket. Arrange them in a single layer, making sure there’s a bit of space between the chicken breasts for air circulation. Depending on the size of your air fryer, you may need to cook the chicken in batches.
- Air fry the chicken breasts at 375°F (190°C) for 10 minutes, flipping them halfway through the cooking time to ensure an even cook. After 10 minutes, check the internal temperature of the chicken using a meat thermometer. The chicken should reach an internal temperature of 165°F (74°C) to be safe to eat.
Step 5: Rest Before Serving
- Once your chicken breasts are done, remove them from the air fryer and let them rest for 5 minutes. Resting helps the juices redistribute, making the chicken even more tender and juicy. Cutting into the chicken too early will cause the juices to run out, leaving you with dry chicken.
Step 6: Serve and Enjoy!
- Slice the chicken breast against the grain for the best texture. You can serve it with a variety of sides such as roasted vegetables, rice, salad, or mashed potatoes. Add a sprinkle of fresh herbs like parsley or thyme for an extra touch of flavor and freshness.
Notes
Variations and Flavor Options
While the classic seasoning blend is delicious, you can easily customize the flavor of your air fryer chicken breasts. Here are a few ideas to switch things up:
- Lemon Herb Chicken: Add lemon zest, lemon juice, and fresh herbs like rosemary and thyme for a fresh, zesty flavor.
- BBQ Chicken: Brush your chicken breasts with your favorite BBQ sauce during the last 2 minutes of cooking for a sweet and tangy finish.
- Spicy Chicken: Add cayenne pepper or chili powder to the seasoning mix for a little extra heat.
- Parmesan Crusted Chicken: Coat the chicken with a mixture of breadcrumbs and grated parmesan before air frying for a crispy, cheesy crust.
Conclusion
Air fryer chicken breasts are an easy, healthy, and quick meal that everyone in the family will love. With the right seasonings and a few simple steps, you can enjoy juicy, flavorful chicken every time. The air fryer gives you that perfect crispy exterior while keeping the chicken moist and tender inside. Try this recipe the next time you’re craving a hassle-free dinner and enjoy the delicious results!
Happy cooking!